Toy barn

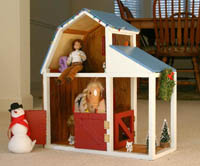
It was the spark that started the fire… and got me interested in working with wood.  My oldest daughter finally got her request–Daddy built her a toy stable for her horses!

This is made predominantly out of solid cherry left over from the hallway bench project.  There is a significant sentimental touch incorporated into this project as well: the swinging doors, the back, and the side of the stable are made from antique red oak removed from a familiy barn that has stood for nearly 170 years.

This toy made an ideal Christmas gift… and has been getting a lot of use lately!

Posted in Woodworking | Leave a comment

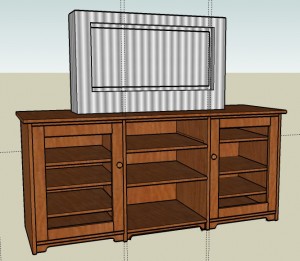
Up Next – Entertainment Credenza

We’ve decided it’s time to replace an aging entertainment center with something a bit more modern… one that will look great with a wide flat-panel television yet serve as a display piece for pictures and knick-knacks. Of course, as any woodworker contends, why buy when you can build?

A file with my Google SketchUp plans is available here: http://www.morsel.info/download_files/Entertainment%20credenza.skp

I expect this will take a considerable amount of time to build but will post my progress and results here. Stay tuned!

Posted in Woodworking | Leave a comment

Entryway Bench

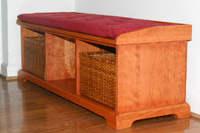
Well, my first “fine furniture” (can I use that terminology as a beginner?) project is finished!  This is a entryway bench designed for relaxing or to change one’s footware.  It is made entirely of solid cherry wood, using traditional joinery and finished with Watco Danish Oil (Cherry and Natural color).

Genesis

Quite often ideas for projects are inspired by designs we see during our daily travels.  In this case, my wife and I came across an entryway bench in a retail store that we liked.  There were only three problems: it was very pricey; the construction consisted of MDF, poplar, and birch veneers; and we didn’t like the “painted veneer” look of that specific design.  So for a beginning woodworker, these factors all came together to create the perfect storm.  Thus the idea grew into my first major “fine furniture” project.

Challenges

For the new woodworker that I am, this bench raised some interesting challenges.  The most significant of these revolved around concerns regarding seasonal contraction and expansion of the wood.  As a relatively mobile family, having lived in quite a few different locations throughout the U.S., accounting for varying humidity levels in our design is an important factor.  I’ll explain how I dealt with these issues later.

The second significant challenge was finding a finish that enhanced the grain, provided a natural “cherry” look, and permitted relatively maintenance-free care.  We struggled through numerous types of finishes, including several brands of gels and stains, before stumbling upon Danish Oil.  Once we discovered the Danish Oil we knew our search was over.  This look provides precisely what we were seeking to obtain.

Designing the Bench

Ahhh… 3D drawings are difficult to do on paper.  In preparation for this design, I discovered Google SketchUp (http://sketchup.google.com), a superb freeware program that helped tremendously in refining the look, dimensions, and proportions of the bench.  You can download a copy of my drawing here: http://www.morsel.info/download_files/Entryway_bench.skp.  Note that I drew the basic sketch of the bench but did not specify the joinery in this model.

There are some nuances regarding the joinery that are important to discuss.  Wood movement, so I’ve been told, can become problematic.  Constrict wide panels from expanding and contracting and you’ll set yourself up for splits or failed joints.  There were three areas where I needed to account for movement in this bench: (1) mounting the side rails to the seat, (2) attaching the rear panel, and (3) setting the carcase in the base assembly.  To resolve these concerns, I mounted the front portion of the side rails using a sliding dovetail configuration; rear sections of the rails are glued.  The rear panel is glued at the top but screwed into the vertical partitions toward the bottom through slotted screw holes.  The base is glued to the carcase near the front but is held to the carcase via wooden buttons at the sides and rear of the base.

Building the Bench

My construction process follows, in chronological order:

  • Buy the wood.   This may be harder than it sounds.  Initially, I naively believed I could purchase most of my wood at home centers.  This may be okay for construction work involving basic oak and pine, but when working with furniture-grade hardwood, a visit to a specialty lumber yard is required.  Exotic Lumber, Inc. (http://www.exoticlumberinc.com) became my lumberyard of choice for this project due to their location, the quality of their wood, and pricing.  I bought approximately 40 board-feet (bf) of 4/4 rough-cut cherry “shorts” (all 5 to 6 feet in length) at $4.25 per bf.  There was no reason to buy longer, more expensive lengths of cherry boards since the maximum dimension (length) is around 50 inches.
  • Face-join, plane, dimension, and edge-join the wood.  First, I examined each board along its length to determine if there was any cupping or twisting.  If there was, and it was significant, I ripped the board in half (lengthwise) to ensure I could get maximum thickness out of it.  I then face-joined each board and ran all boards through the thickness planer to get between 3/4 and 7/8-inch thickness.  Although my target stock was 3/4″, it’s important to account for losses from sanding the final product.  Next, I edge-joined one side of each board, and trimmed the other on a table saw to ensure parallel edges.  I then joined the trimmed edges.
  • Arrange boards.  Before gluing up panels, I arranged the boards for appearance and fit, and cross-cut each to a length several inches longer than required.  When arranging the boards, I looked at the end grain and attempted to alternate direction of the grain by making the “u” shapes point up and down alternatingly; this helps to compensate for possible wood movement and associated cupping across the panel.  I also arranged the boards so that the “u” shapes pointed in the SAME direction on the face of each panel, for purely aesthetic reasons.
  • Glue up panels.  I’ve learned through numerous sources that standard wood glue provides plenty of strength for long-grain joints.  Biscuits could be used to help with alignment, but are not needed for structural integrity.  Therefore, I spread glue across each edge, rubbed edges together, laid them on waxed pipe clamps, placed additional clamps above the board (between bottom clamps), and slowly tightened them.  You may need to use a rubber or dead-blow mallet (NOT a steel hammer!) to force the boards flush with each other.  After 20 minutes or so you can scrape the squeeze-out (without moving the clamps) from the face of all accessible joints using a cabinet scraper (my preference).  It works best when the glue is still a little tacky.  I let the panels dry for 24 hours, then ran them through a wide belt sander to remove any remaining glue squeeze-out and even out any misalignment between joints.
  • Rip and cross-cut panels to final dimensions.  I used the sliding mitre table (SMT) on my Craftsman table saw to cross-cut.  I ran into some problems with the table not being perfectly parallel (shame on me!), and had to trim a couple panels with a straight router bit to clean up some of the edges.  Lesson learned: Always verify alignment of your equipment before cutting; measure twice; and cut once!  I also cut notches in the center vertical panels using a band saw.
  • Cut stopped tongue-and-groove joints in panels.  I clamped a straight-edge to the panel and used a straight router bit to cut each groove.  Why stopped joints?  Simple: I didn’t want the joinery to be visible, and wanted to avoid corner gapping in the event my dados weren’t perfect.  Forming the tongue on each panel (both sides) was accomplished with a straight bit and router mounted in my table saw.  I spent a lot of time sneaking up on the thickness to make sure the fit in each groove was nice and tight.  The tongues and grooves on the left and right side panels were offset closer to the inside of the bench to allow a thicker lip on the top and bottom panels.  Tongues and grooves were centered on the two center vertical panels.
  • Build rear panel.  Since the rear panel didn’t need to be the full 3/4″ thick, I cut grooves on both sides of the lumber with a table saw, then resawed the boards with a 21″ band saw.  After planing and joining I did the panel glueup as before, followed by sanding and dimensioning.
  • Sand all flat surfaces.  I used a random orbital sander (ROS) starting with 100-grit, and moved through 150- and 220-grit paper.  This sure took a lot of time, but a good sanding job is critical to obtaining a nice finish.  Wow–I discovered that connecting the ROS to a shop vac was extremely effective for removing the sawdust!
  • Assemble and glue the carcase together.  This involved a lot of nervous sweating since it’s easy to ruin a lot of hard work if things don’t glue together properly.  First, I protected visible edges from glue squeeze-out and drips with blue painter’s tape and waxed paper.  With some assistance, I did a dry-run assembly and set the length of my pipe clamps.  Then we spread glue throughout each groove and quickly assembled the bench.  use of a dead-blow mallet helped to push things together properly.  We checked the corners for 90-degree joints with a couple of squares, then clamped everything down.  After about 20 minutes I removed tape and waxed paper, then removed residual squeeze-out with the corner of a cabinet scraper.
  • Cut and glue cross-braces between vertical separators.  I sneaked up on the fit with a disc sander on my table saw to make sure these were snug, then glued them to the underside of the bench top between each separator (back of bench).  The front cross-brace fitted within the notches and fits against the inside of the outer sides; it was also glued in place.
  • Build the base.  I cross-cut the base members to length and mitred the corners with a mitre saw, then built square supports (2″ blocks) for the insides of the base frame.  These add structural integrity to the mitre joints, but also support the full weight of the bench.  Everything was then glued together and clamped together.  A band clamp helped to keep the mitres from slipping.   I then routed a rabbet on the back inside of the base, and chiseled the ends of the rabbet square.  Slots were cut on the inside left, right, and back of the base to hold shop-made wooden buttons to allow for wood movement.  I tapered the corners with the ROS, then hand-sanded everything.  I made buttons using the band saw and router, and
  • Countersink rear-panel screw holes.  A slotted router bit worked great for this, designed for 3/4″ long #8 tapered-head wood screws.  I designed the rear panel to fasten it with glue right under the top rail and to allow for wood movement by screwing it to the vertical supports about 1/3 of the way up from the bottom.  The countersunk slotted screw holes allow for movement.
  • Glue the base in place.  I checked to make sure everything was level first, then glued the front edge and the front support blocks to the bottom panel.  I left the rear to float but glued and screwed wooden buttons to the bottom panel on the sides and back, with the lip inserted into slots within the base.
  • Cut and shape top rails (side and rear).  A band saw, mitre saw, and belt sander were used to create these pieces.
  • Cut sliding dovetail joints for side rails.  This was the most challenging part of the project.  Since the seat of the bench may expand and contract front-to-back, across the grain, the side rails have potential to constrict that movement.  I don’t know if this was the best possible solution, but I routed a stopped sliding dovetail groove from the back of each side rail to about 2″ from the front.  Then I cut 3″ long tails to fit into the front portion of each rail and glued these in place to the bench top.  Since this is a long-grain to end-grain joint, which is not as strong as a long-grain to long-grain joint, I thinned the glue with water first and let it soak in for about 5 minutes before applying full-strength glue and attaching the tail.  Caution: Alignment of the tail was critical; if slightly off, the mitre won’t meet the rear rail mitre properly.  I also cut tail blanks to insert into the rear of each rail once installed.  These blanks will be glued to both the rail and to the rear of the bench seat.
  • Glue top rails in place.  First I glued the rear rail in place.  Next, I slid the rails over the dovetails (approaching from the front), inserted the blank tail into the rear of the groove, and glued the blank to both the bench seat and to the rail.  Side and rear rail mitres were glued together and the entire assembly was held together with pipe and band clamps.
  • Do final sanding.  I used 220-grit sandpaper over the entire bench, including the rear panel (not yet attached).  I examined each surface very carefully since imperfections become blatantly obvious once any stain or finish is applied.
  • Finish with Danish Oil.  The rear panel will be glued to the rear cross-braces immediately underneath the rear rail.  Therefore, I protected this section with blue painter’s tape before finishing.  I then applied two coats of cherry-tinted Watco Danish Oil and one of Natural Watco Danish Oil per instructions on the can.  I rubbed it in well with a cloth about 45 minutes after each application to obtain a semi-glossy appearance.  I allowed 8-12 hours dry time between applications and lightly rubbed with #0000 steel wool before applying subsequent coats.  Note that the rear panel was finished separately since that made it easier to reach into the carcase.
  • Mount rear panel.  I glued the top edge, drilled pilot holes into the vertical supports, and drove #8 wood screws to hold it in place.

And that’s it!  Whew, this took a lot more time and effort than I anticipated when I first began this project.  I suspect my procedures will become much more efficient over time as technique and skill level advance.

Closing Thoughts

I love the way this bench looks, and am very pleased with the solid feel.  If I decide to build another one in the future, I may revisit how the side rails are mounted to the seat.  The sliding dovetail joinery was difficult to accomplish accurately, and I’m not completely sure how it will hold up over the long-term–especially since the tails are glued to end-grain wood.

But without a doubt, we’re very happy with the end result and expect to enjoy using it for many years to come.

Special Thanks

As a newbie, it was very helpful to have considerable expertise available at BT3CENTRAL (http://www.bt3central.com) to provide recommendations on joinery, finishing, 3D sketching, and equipment.  Thanks to all who provided their insight.

Posted in Woodworking | Leave a comment

New hobby!

Well, it looks as though I’ve caught the woodworking bug!

It all started with our oldest daughter asking Daddy to build a toy barn for her horses.  Never having done much work with wood in the past, this seemed like an interesting challenge.  So I bought a band saw, tried cutting out a few shapes, and became instantly hooked.

This blog will discuss my entry into this exciting world, with a focus on projects as they develop and reach completion.

Posted in Woodworking | Leave a comment

Selecting a web host

When building a web site, one of the first decisions you will need to make is the hosting method you will use. In order for a site to be available to anyone on the Internet, it needs to be installed on a system that is accessible 24/7. For most people this means employing one of three methods: dedicated hosting, shared hosting, or individual hosting. Read each tab below for a brief description of each.

Dedicated: This is a service offered by larger hosting companies wherein a computer is specifically assigned for your use. Basically, you’re renting a computer that is connected to the Internet at the host’s facility. It is dedicated to your use only. The most significant advantages is security (when held in a protected facility) and speed. The biggest disadvantage is the cost.

Shared: A shared host is a hosting method configured to allow multiple web sites, established by different clients, to be served by the same system. This is the most common method for individuals and small-to-medium sized companies and individuals with moderate speed and server load requirements. Cost is the most significant advantage. Disadvantages include speed, since activity on one client’s site could impact the system’s ability to serve your pages.

Individual: A third option involves building one’s own server and connecting it full-time to the Internet from within your own home (or company). Many individuals are using Microsoft Windows or Linux operating systems equipped with Apache or another web serving software package as their host. Advantages include low cost (electricity only assuming you’re already paying for Internet access), and full freedom to manage your own system as desired. The biggest disadvantage is having to rely on your own expertise to fix problems that may arise.

For my purposes, the second option–shared hosting–proved to be the best choice. I signed up with Bluehost.com and have never looked back. This company is quite large and well-established, which is important for sake of longevity. I also like the fact that they will not allow adult-oriented sites on their servers, an important consideration for me.

Bluehost.com offers a very good package for a great price. At present, for a flat monthly fee of $6.95 (paid a full year in advance), you will get 1500 GigaBytes of storage space (that’s 5x the storage on my own home PC!), 15 Terabytes of data transfer each month, an unlimited number of domains and subdomains on that account, linux/Apache-based hosting, mySQL databases (needed for many scripts, including Joomla!), and even “shell” access. The latter is equivalent to using the Command prompt on Windows systems and gives an extra measure of flexibility. Those numbers far exceed my requirements, but nevertheless are available to me.

What really impresses me with Bluehost.com, however, isn’t the numbers–it’s the level of free technical support they provide. As a relatively new web site developer I’ve had to contact their technical support staff on several occasions. Without fail, their responses have been exceptionally on-target, accurate, and timely, both via email and over the telephone. I have trouble understanding how they can offer this level of support for such a modest monthly hosting fee, but they are apparently continuing to do well and have become one of the larger shared hosts with close to 1 million domains.

Bottom line–I’ve been very pleased with Bluehost.com and strongly recommend it to anyone considering a shared hosting plan.

Posted in Tech | Leave a comment

Personal Video Recorder – Home-built

I’ve recently jumped into the world of home-built Personal Video Recorders (PVR). What does this mean? I set up a computer next to the television, connected it to a hardware-based encoder, and use it to capture over-the-air analog TV broadcasts onto a hard drive in a format that can later be easily played on the TV (through the video card output) or archived onto a DVD. It also allows me to “pause” live TV and to even access the programming guide from the Internet to make changes.

This wasn’t an extremely simple task, but came together rather well after a little bit of research. This section summarizes my approach.

There are two major components to my setup: the hardware (computer & capture device/encoder), and the software.

Hardware

My computer consists of a 800 MHz Pentium III with 256 MB RAM, a 120 GB hard drive, Soundblaster-compatible sound card, and a Gigabyte Radeon 9550 video card (S-video output available). It is running Windows XP Professional. I’ve made a couple of tweaks to the hardware in an attempt to reduce the noise level, having discovered that the CPU fan and the power supply fan created the most significant amount of noise. Consequently, I replaced the CPU fan with an extremely quiet “Scythe Katana CPU Cooler,” and am running it at a reduced speed by using a Zalman Noiseless Resistor Cable which lowers the voltage. I also purchased an Antec Smartpower-series 500W power supply.

The Hauppauge WinTV-PVR-USB2 is my hardware encoder of choice for capturing analog over-the-air video. I can easily feed It provides the standard S-Video and composite video inputs (one each) and RCA-type audio input plugs, and feeds the video through a USB cable already converted into MPEG-2 digital format.

Software

Sometimes the best things in life truly are free. I’ve discovered a great software package that does just about everything, including downloading a broadcast program guide periodically: GB-PVR. It is undergoing active development and even supports plug-ins (for instance, it will download the weather forecast and allow you to read your e-mail on the TV).

To get the program guide, you’ll need to sign up for an account at Zap2It. Zap2It does not charge for this service, but will require you to renew your account every three months by answering a few survey questions (a minor price to pay for this capability).

Special note on WinTV-PVR-USB2 Audio Levels

Hauppauge haven’t released any guidance on adjusting the audio levels for the WinTV-PVR-USB2.  I’ve done some digging…. and found a solution.

The Hauupauge WinTV-PVR-USB2 is a great external device for capturing analog video and converting it into DVD-compatible MPEG2 streams.  I’ve only found one problem with it: For some sources, the audio levels are set too high.  In both live TV recording and external source capturing, the audio on my unit is too ‘hot’, causing distortion whenever sound levels reach peak values. Unfortunately, Hauppauge does not provide an easy (or documented!) mechanism to change the recorded volume. You cannot simply change the recording input level with your sound card utility or the Windows audio controls. Why? Because the sound is sent along with the video through the USB port, already digitally encoded (in MP3 format), and never passes through your sound card. There are no adjustment controls provided in either the hardware or the WinTV2000 software.Unfortunately, there is no simple ‘volume control’ or other mechanism for adjusting it.

So what is the solution?  This took me over a week of fiddling, e-mail exchanges with Hauppauge’s tech support, and Internet searches to discover this ‘trick.’

‘Device Manager). Expand the ‘Sound/Video Game Controllers’ branch and select the Hauppauge device. Right-click and ‘update driver’; when prompted, select the temporary directory where you installed the files. After installation, be sure to reboot your computer.

Next, run the Windows Registry Editor (regedit). Recommend making a backup of your registry first, though, just in case you accidentally change or delete something that should not have been edited!

Go to the Windows XP ‘Start’ menu and choose ‘Run’. Enter ‘Regedit’ and hit the ‘OK’ button. Proceed through the trees and locate the following branch:

My Computer\ HKEY_LOCAL_MACHINE\ SYSTEM\ ControlSet001\ Services\ Conexant\ Parameters\ ivac15\ DrvUSB

Look through the list of keys to see if you can locate an ‘Scart1Volume’ key. If it isn’t there, you’ll need to add one by following these steps:

1. Right-click on the DrvUSB branch and select “New | DWORD Value’.
2. Enter ‘Scart1Volume’
3. Right-click on ‘Scart1Volume’ and select ‘Modify.’
4. Enter a hexadecimal value of 7301 (the default box configuration) and click OK, then restart your computer.

The volume level can be changed by modifying the data value for the Scart1Volume key. The last four digits should look something like this (and will be identical if you’ve entered the key manually as above): ‘7301’. You will only change the first two digits of this last set of four (e.g., the ’73’). DO NOT change the last two digits; they should always be ’01’.

The volume level is represented in a hexadecimal (base 16) format. As far as I can glean from tech support and sparse information scattered on the web, each hexadecimal increment from 73 represents a 1 decibel value in volume level. For instance, to achieve a 3 dB drop, enter ’70’ in place of the 73. Finding the actual value to use involves a little bit of trial and error; for my camcorder, replacing the ’73’ with ‘6d’ (a drop of 6 dB) is sufficient.

One final note on this topic: I’ve only tried this on my Windows XP machine using a single Hauppauge device. I can’t confirm with certainty that it will work on yours, with your versions of firmware, software drivers, etc. You may wish to try setting this value to ’00’ (effectively muting the volume) first just to make sure this registry entry works; if it does, then go to work experimenting and selecting the appropriate value.
Posted in Tech | Leave a comment